Remote Store Australia
ATA PTX-4 Compatible Remote
ATA PTX-4 Compatible Remote
Couldn't load pickup availability
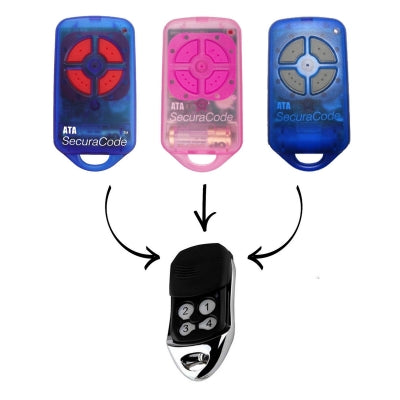
The product that you will receive is the item that is being pointed to by the arrows which is an aftermarket compatible remote.
Compatibility:
- CRX-1 (Receiver)
- CRX-2 (Receiver)
- GDO-2v5 (SecuraLift)
- GDO-2v6 (SecuraLift)
- GDO-2v7 (SecuraLift)
- GDO-4v3 (EasyRoller)
- GDO-4v4 (EasyRoller)
- GDO-4v5 (EasyRoller)
- GDO-4v6 (EasyRoller)
- GDO-6v1 (Slim-Drive EasyRoller)
- GDO-6v2 (Slim-Drive EasyRoller)
- GDO-7v1 (SecuraLift)
- GDO-8v1 (EasyRoller II)
- GDO-8v2 (EasyRoller II)
- GDO-9v1 (SecuraLift)
- Free Battery
- Free Keychain
- Heavy Duty Design
- In-built Battery
- Button Protector
- Transmitter Frequency: 433 MHz
- Battery: 27A 12V
- Coding Type: Rolling
- Control up to 4 doors
Programming a remote via the motor/receiver
1.Some garage motors have a plastic cover which covers the buttons, please remove this cover.
2.Press and hold the blue Door Code button on the motor or the SW1 or SW2 button on the receiver board (do not let go of
this button).
3.Press the new remote’s button which you would like to use to control the door for two seconds.
4.Release the button on the new remote and for two seconds. Press the same button on the remote again for two seconds.
5.Release the Door Code or SW button from the motor/receiver.
6.Press the new remote button to test operation of the door.
Deleting all remotes from the motor
1.Turn the power off to the motor from the power socket.
2.Press and hold the Door Code or SW1 button on the motor.
3.Turn the power back
on, whilst still holding the Door Code button. The Door Code LED
will illuminate after a few seconds to indicate the memory has been cleared.
4.Release the Door Code button and test your remote to ensure it has been deleted and
it should not operate the door.
Programming a new remote to a gate via original remote
1.Stand within 1-2 meters of your gates control board.
2.Press the button on your original remote to either open/close the gate.
3.Immediately after door begins to move, insert a pin into the center coding hole of the original remote located in the center of the four buttons. The LED light of the remote will illuminate when successfully pressed and ensure the light is illuminated for at least
2 seconds.
4.Remove the pin from the original remote.
5.On the new remote push and hold the new button you wish to operate the gate for 2 seconds.
6.Release the button for two seconds.
7.Push the same button again on the new remote for 2 seconds.
8.Wait 10-15 seconds and test the new remote
Share

